In Part 1, we finished the setup to start creating our CI/CD pipeline.
In Part 2, we will create a workflow to run our automated tests based on some trigger events.
Update .gitignore
Before you create your workflow, you need to ignore the files generated by GameCI. Update the .gitignore file with these lines:
/[Aa]rtifacts/
/[Cc]odeCoverage/
Setting the Trigger Events
Now, you need to define when your pipeline should trigger.
Create .github/workflows/main.yml and add the following workflow definition:
name: Test, Build, and Deploy with GameCI
on:
  push:
    branches:
      - main
    paths:
      - 'Assets/**'
      - 'Packages/**'
      - 'ProjectSettings/**'
  pull_request:
    types:
      - opened
      - synchronize
    branches:
      - main
    paths:
      - 'Assets/**'
      - 'Packages/**'
      - 'ProjectSettings/**'
      - '.github/workflows/**'
  release:
    types:
      — published
  workflow_dispatch:
    inputs:
      release_platform:
        description: 'release [ios, web, testflight]'
        required: false
        default: 'release '
jobs:
A lot is going on here, so let's break it down:
- on: Specify the events that trigger the workflow.
- push -> branches : push event to the "main" branch
- paths: filter to only changes that happen in the Unity project or the workflows.
- pull_request -> types: pull request is opened or updated against the "main" branch.
- paths: filter to only changes that happen in the Unity project or the workflows. (Same as the push event).
- release -> publish: publish a release.
- workflow_dispatch: manually trigger the workflow using the GitHub Actions interface.
- input -> release_platform: input to specify the platform. Add the default text to "release" so that there is less typing.
- push -> branches : push event to the "main" branch
Building and Running Tests
Next, add a new job to build and run the Unity project tests
jobs:

  test:
    name: Build and Run Tests
    runs-on: ubuntu-latest
    steps:
      # Checkout with lfs
      - name: Checkout Repository
        uses: actions/checkout@v4
        with:
          fetch-depth: 1
          lfs: true

      - name: Cache Library
        uses: actions/cache@v4
        with:
          path: Library
          key: Library-test-${{ hashFiles('Assets/**') }}
          restore-keys: |
            Library-test-${{ hashFiles('Assets/**') }}
            Library-test

      - name: Run Tests
        uses: game-ci/unity-test-runner@v4
        env:
          UNITY_LICENSE: ${{ secrets.UNITY_LICENSE }}
          UNITY_EMAIL: ${{ secrets.UNITY_EMAIL }}
          UNITY_PASSWORD: ${{ secrets.UNITY_PASSWORD }}
        with:
          githubToken: ${{ secrets.GITHUB_TOKEN }}
Now, let's look at whats happening in this job:
- runs-on: The job should run on an lates Ubuntu-based runner.
- steps: The steps to execute for this job.
- Checkout Repository: Check out the code
- fetch-depth: Get only the last commit of the branch.
- lfs: Download files tracked by LFS.
- Cache Library: Cache the "Library" directory, to make subsequent runs faster.
- Run Tests: Runs the Unity tests.
- env: Set the environment variables
- with -> githubToken: Set the GITHUB_TOKEN from the secrets to report the test results.
- Checkout Repository: Check out the code
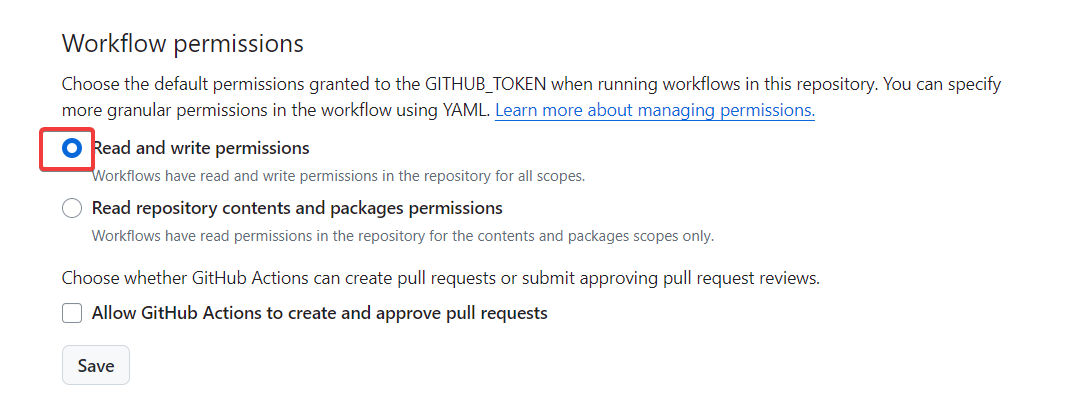
Set Workflow Permissions
To view test results as part of the Github Status check, you need to provide write permissions to the workflow
Go to Settings > Actions > General > Workflow permissions and choose Read and write permissions.
Preparing the Project
If the project builds in the editor but fails when you run the workflow, its likely because of missing packages.
Luckily, its a simple fix.
Verify Packages
Ensure that these entries are present in packages/manifest.json:
com.unity.2d.spritecom.unity.inputsystemcom.unity.test-frameworkcom.unity.textmeshpro
If any of these packages are missing, add them using the Unity Package Manager. Remember to commit the changes in packages/manifest.json and packages/package-lock.json.
Conclusion
In this part, we set up the trigger events for the workflow and added a job to build and run tests. Next, we will add a job to build the project for different platforms.